

How To Put In Replacement Camera Screw

-
Open the door. Release the take hold of by sliding it towards the side of the camera.
-
Then slide the door towards the front of the camera.


-
Remove AA batteries.
-
Using a fingernail or iFixit opening tools to pry upwards the battery cradle.
-
Remove CR1220 bombardment from the cradle.

-
Remove two PH 00 screws on each side of the eyepiece.

-
Remove the 2 PH 00 screws on the right console of the camera.

-
Remove five PH 00 screws on the bottom.


-
Use the iFixit opening tool to free the back casing from the rest of the photographic camera trunk.
-
Gently elevator up on the black latch holding the ribbon cablevision in place and slide the ribbon out.


-
Remove three screws on the left side of the camera.
-
Slide the left side casing up and off of the camera body.

-
Remove two screws holding the front end casing to the body.


-
Remove two cables continued to the motherboard.
-
Use sparse tweezers to push down on the clear slice and slide it out. At this signal half of the clear piece should be free.
-
Remove one spiral that is belongings down the middle of the articulate slice to the body of the camera. The whole construction with wires will swing out.


-
Using the iFixit opening tool, gently pry along the top edge of the front casing.
-
Move to the right side of the camera and gently pry at the top and bottom areas of this part of the casing. The front end casing will come costless in one case information technology has been pried here.
-
The front casing will be able to slide away from the body of the camera.


-
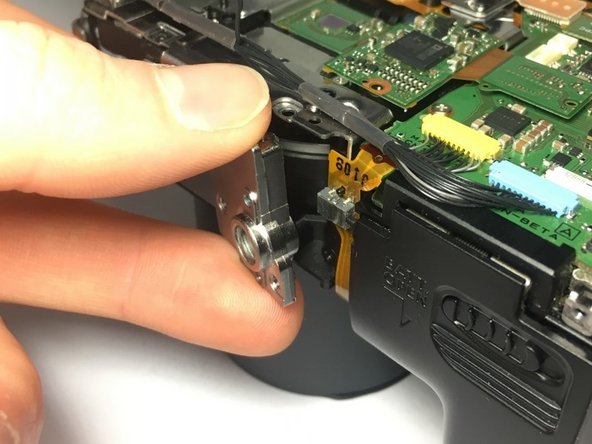
Remove ane spiral that holds both a black cable and part of the tripod mount.
-
The silver bracket and black cable volition pop right off.

-
Remove the 4 screws remaining that hold the tripod screw mountain into the trunk of the photographic camera.
-
Using your fingers, remove the tripod screw mount from the body of the photographic camera.

Source: https://www.ifixit.com/Guide/Canon+Powershot+SX10+IS+Tripod+Screw+Mount+Replacement/122824
Posted by: jarvisthele1947.blogspot.com
0 Response to "How To Put In Replacement Camera Screw"
Post a Comment